How to Clone Smart 450 BCM Using Xhorse Multi Prog
In this article, we will explore the process of cloning a Smart 450 Body Control Module (BCM) using the Xhorse Multi Prog tool. The goal is to read and transfer data from the original BCM to a replacement unit, ensuring seamless functionality.
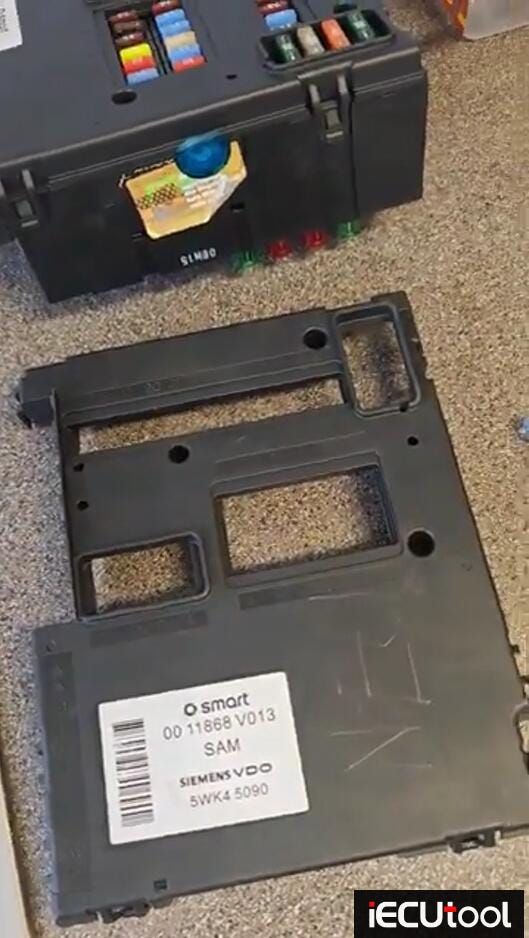
Step 1: Preparing the BCM
The first step involves connecting the Multi prog tool to the BCM:
Pinout Identification — The BCM uses a 4-wire connection (power, ground, and two data lines).
Smart 450 BCM pinout (for multi prog, vvdi prog and x-prog etc). VVDI Prog can also clone smart 450 bcm.

Tool Connection — The Multiprog is attached to the BCM, ensuring proper contact with the pins.


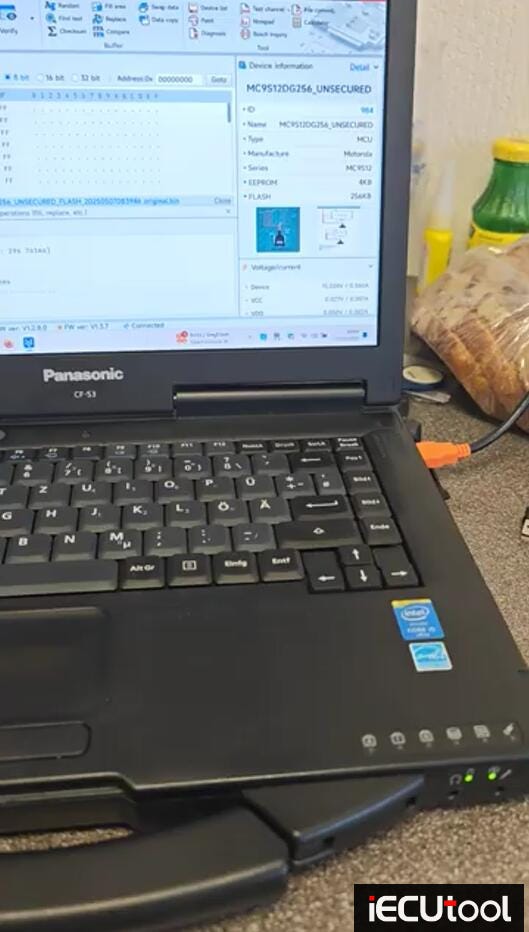
Step 2: Reading the Original BCM Data
Read the data from the original BCM:
- Reading EEPROM and Flash — The tool extracts data from both the EEPROM and Flash memory of the BCM.
- Verification — The Multiprog automatically performs a verification check to ensure the data is read correctly.
Key Observations:
- The BCM contains a Motorola 912 256 chip, which is unsecured (not encrypted), making the cloning process straightforward.
- The Chip ID (processor identifier) is visible, confirming compatibility.
Step 3: Writing Data to the New BCM
After successfully reading the original data, the next step is transferring it to the replacement BCM:
- Writing EEPROM and Flash — The same data is written to the new BCM.
- Automatic Verification — The tool cross-checks the written data to ensure accuracy.


Step 4: Testing and Final Steps
Once the cloning is complete:
- The replacement BCM should function identically to the original.
This process is efficient, taking only a few minutes, and works well due to the unsecured Motorola chip. For those attempting this, referencing online pinout diagrams is essential for a smooth workflow.
Compare OBDSTAR DC706 Bench V2 and V3 Cables
What is the difference between OBDSTAR DC706 bench V2 and Bench V3 jumper cables?
1. The jumper cable that comes with DC706 package is the
Bench-B V2 cable.
It is used with P004
adapter to clone some ECMs/TCMs.

The bench-B V2 cable connects with P004 adapter like this:
2.The jumper cable that was purchased separately or comes with MP001 is the Bench-A V3 cable. It is used for P003, P003+ and MP001 adapters.
It is used to clone some ECUs.
The bench-A V3 cable connects with MP001 programmer like this:

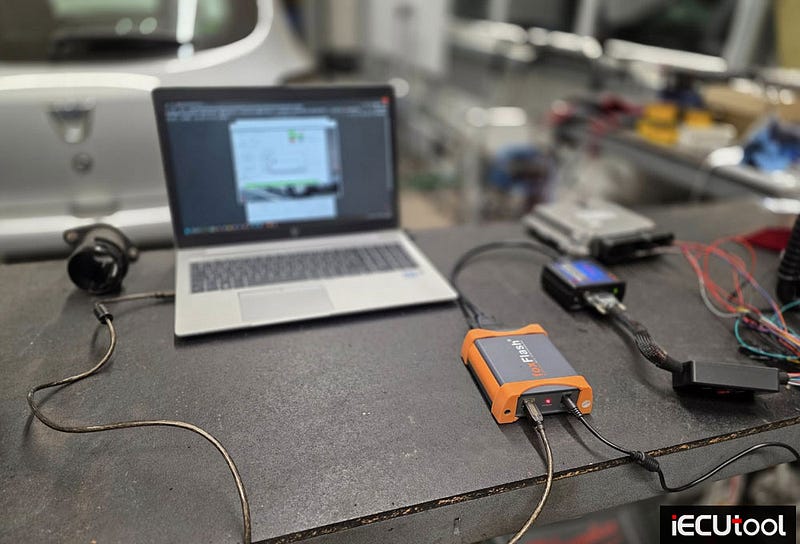
Mercedes EDC17C66 ECU Write & Checksum: PCMFlash vs Foxflash
PCMFlash vs Foxflash which to read and write Mercedes EDC17C66 ECU?
Model example:
Mercedes V-Class 2.2CDI 2015
PCMFlash:
Read over OBD ok, Write via OBD ok, checksum no.

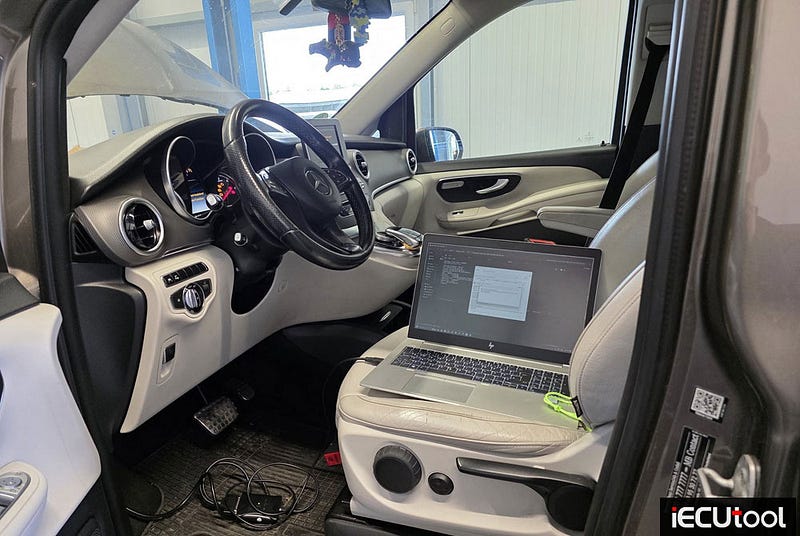
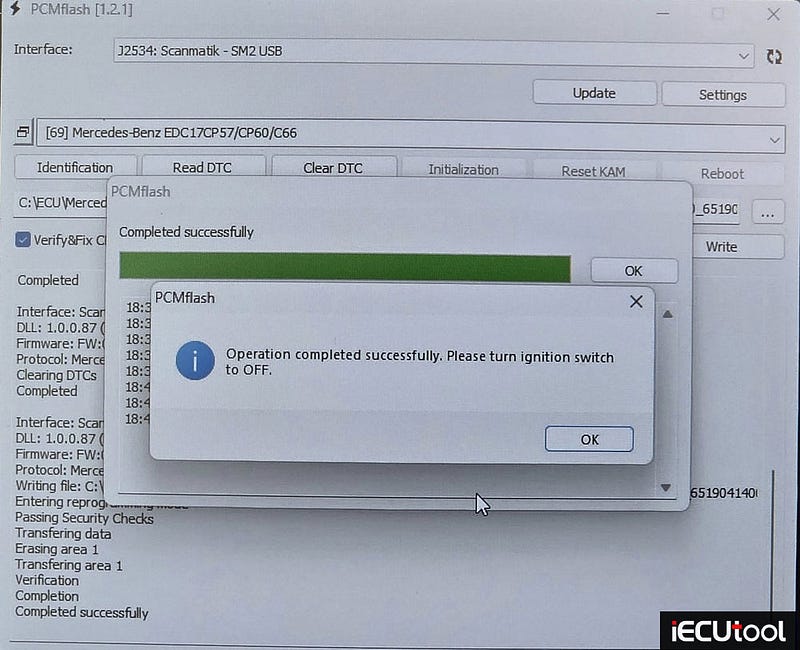
Bench read ok, bench write ok, checksum by foxflash.
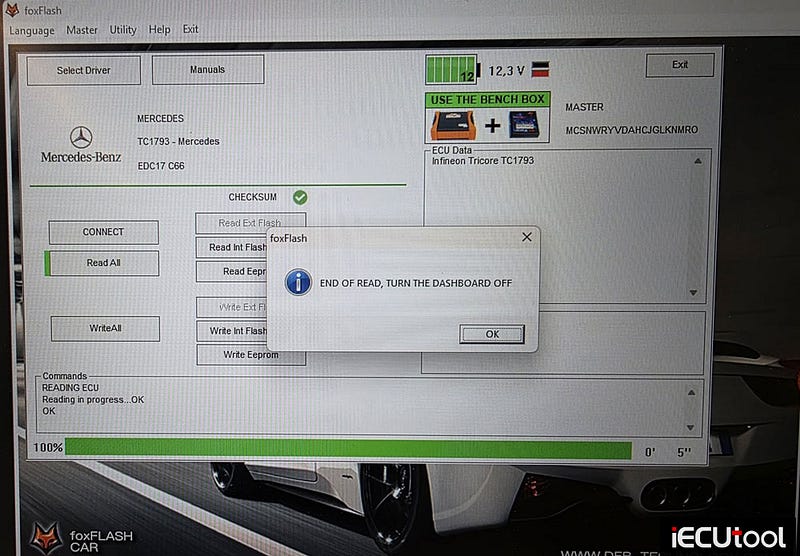
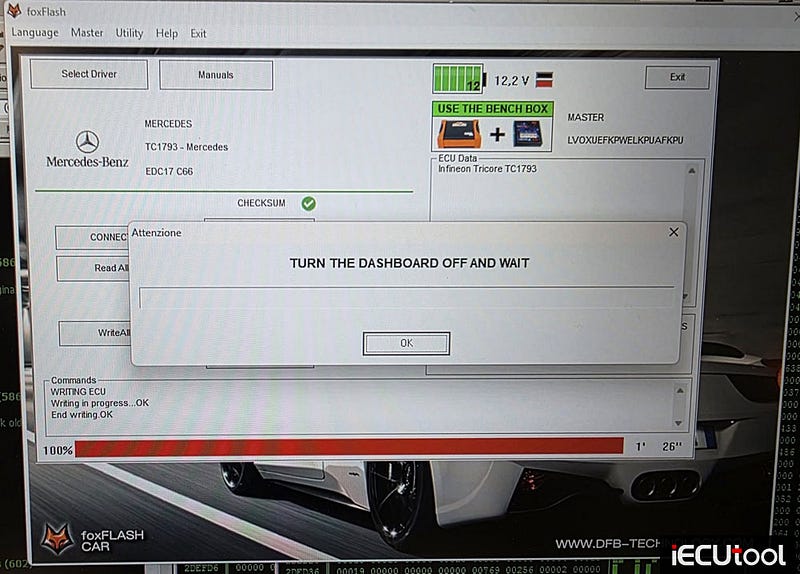
Check your cars for previous ecu change before doing anything, it can cost you couple of hours to resolve a simple issue. The car was tuned from someone else, and it had a different checksum, when i did a read i forgot to uncheck the checksum check which after read couldn’t do a correct checksum and that’s why the car didn’t want to start. Later i tried to flash ECU with Launch X431 PAD V with original file, but still the same. After that i flashed the file i took out from the car, took out the ECU and did it on bech with Foxflash and corrected the checksum with Winols for the whole file. Which resolved the problem.
How to Solve PADFlash "Connection to Tool Lost" Issue
Problem:
Failed to start PADflash software after activation. Win10 64bit
system.
Error 1: Connection to tool lost.
Error 2:
Device Init Error.
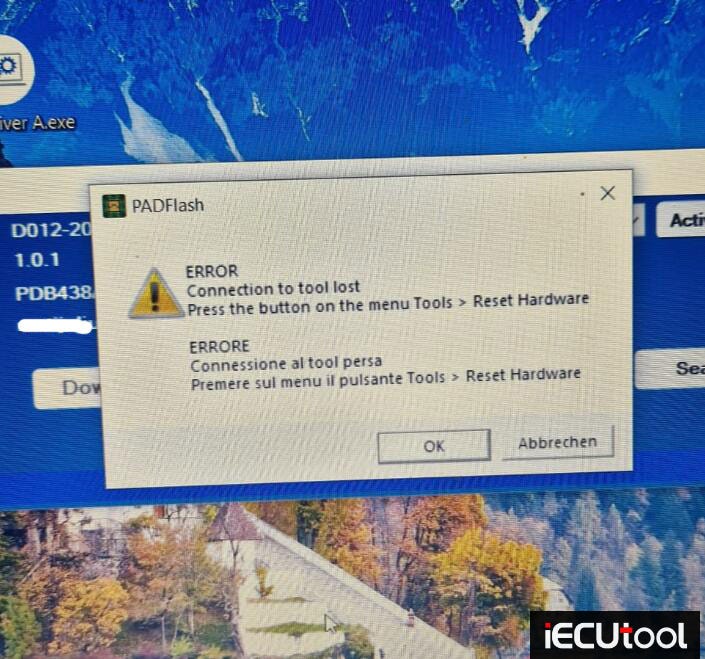

Solution:
1. Disable USB selective suspend/power-saving for all USB
ports.
This turns off USB sleep mode to prevent devices from
disconnecting.
2. Enable Administrator Mode."
(Activates
standard administrator privileges for the account.)
3. Grant
the computer Super Administrator (Elevated) access.
Provides highest
system-level permissions (Super Admin).
If still not working, contact www.iecutool.eu customer service for help.
Read also:
How to Solve Foxflash Cannot Connect to VL300 Issue
Problem:
Have a problem connecting in bench mode with the Audi A4 TEMIC VL300 CVT
transmission control unit.
Foxflash software cannot identify or read the
unit.
Attaching screenshots.

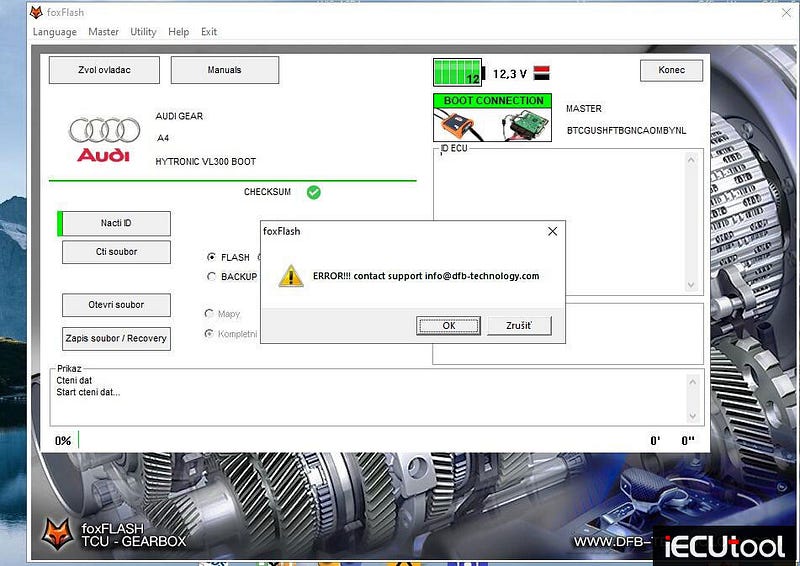
Solution:
Foxflash will read and write Temic VL300 gearbox TCU in boot mode.

Don’t do it on bench mode. Don’t use Godiag GT107 gearbox adapter.
Follow foxflash instructions to read VL300 TCU in boot.
Instruction:
Drill a hole in the cover underneath:
DO NOT EXCEED 5 mm IN DEPTH.
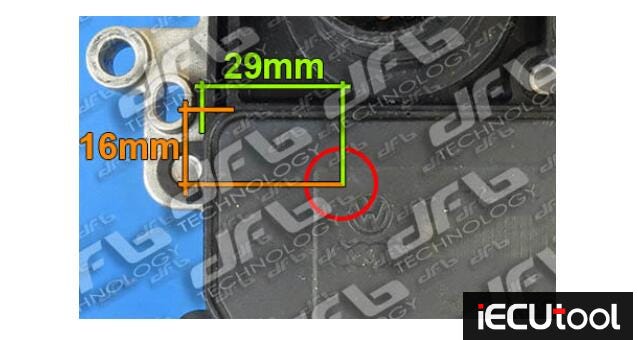
To connect to the control unit use:
– Multifunction cable
– Round Pin connectors
– Needle
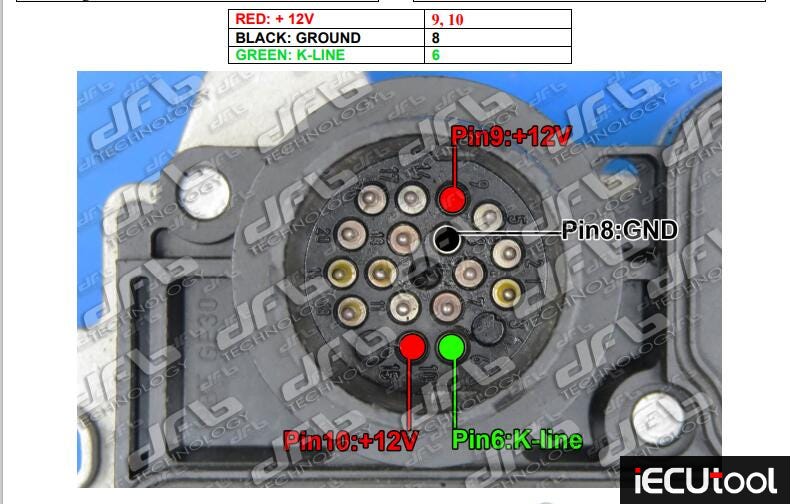

IMPORTANT:
SEAL THE HOLE WITH TWO-COMPONENT GLUE AFTER COMPLETION OF THE WORK.
Read also:
http://www.pcmtuner.org/foxflash-read-and-write-audi-vl300-gearbox-success/